How To Retrofit Led Lighting In An Old Kitchen Without Full Rewiring
Many folks want to update their old kitchen lights with new, energy-saving LEDs. But the thought of How to Retrofit LED Lighting in an Old Kitchen Without Full Rewiring can feel tricky. You might worry about messing with wires or needing an electrician.
Don’t fret! This guide breaks it down super simply, step-by-step. We’ll show you exactly how to get bright, new lights without a big, messy job.
Get ready to see your kitchen in a whole new light!
Key Takeaways
- You can swap out old light bulbs for LEDs without changing your kitchen’s wiring.
- Understanding your current light fixtures is the first important step.
- There are easy ways to add new LED lights even if your current setup is basic.
- Safety is key, and we’ll cover how to work safely with electricity.
- New LED lights can make your kitchen look brighter and feel more modern.
![How To Retrofit Led Lighting In An Old Kitchen Without Full Rewiring[1]](https://kitchentoolslab.com/wp-content/uploads/2026/05/How_To_Retrofit_Led_Lighting_In_An_Old_Kitchen_Without_Full_Rewiring1.jpg)
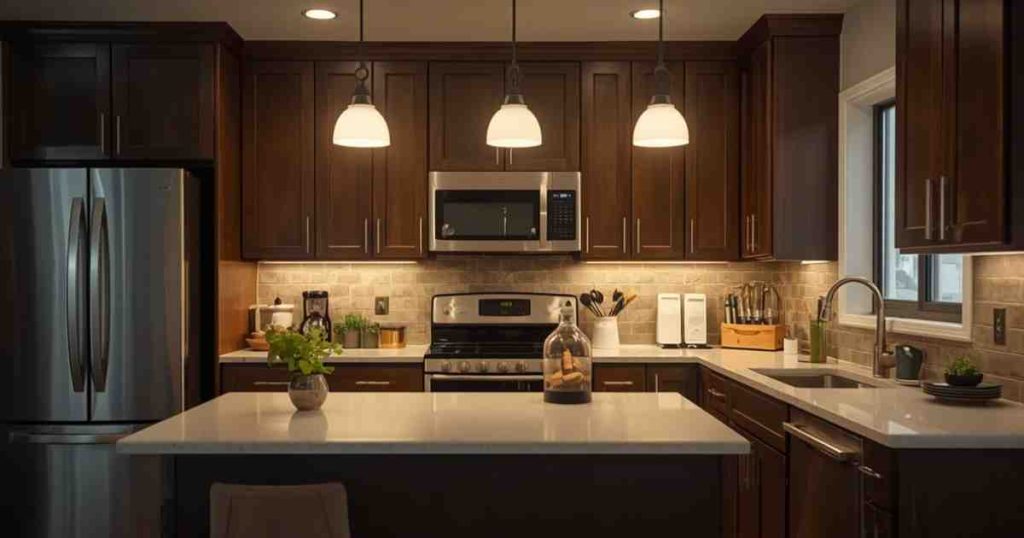
Updating Your Kitchen’s Look with LED Lighting
Updating your kitchen with new lighting can make a huge difference. It can make the space feel brighter, more welcoming, and even more functional. When thinking about How to Retrofit LED Lighting in an Old Kitchen Without Full Rewiring, many people imagine a huge, disruptive project.
They picture pulling out old wires and installing complex new systems. This often stops them from even starting. But it doesn’t have to be that way.
There are many simple solutions that let you enjoy the benefits of LED lights without the hassle and expense of a full rewiring job. This section will guide you through why this upgrade is so popular and how achievable it is for anyone.
Why LED Lighting is a Smart Choice
LED lights are a fantastic upgrade for any home, especially older kitchens. They use much less electricity than old incandescent bulbs. This means you save money on your energy bills.
This means you save money on your energy bills.
Plus, LEDs last a very long time. You won’t have to change bulbs nearly as often. This saves you time and money in the long run.
LED lights also offer better light quality. They can be brighter and come in different color temperatures. This lets you set the mood in your kitchen, from bright and functional for cooking to warm and cozy for relaxing.
Many people are also concerned about the environmental impact of their homes. LEDs are a greener choice because they use less energy. They also don’t contain harmful materials like mercury, which are found in some older lighting types.
Making the switch is a simple way to make your kitchen more eco-friendly. It’s a win-win for your wallet and the planet.
Common Challenges for Beginners
For beginners looking into How to Retrofit LED Lighting in an Old Kitchen Without Full Rewiring, a few things often cause worry. The biggest is usually a fear of electricity. Working with wires can seem dangerous if you don’t know what you’re doing.
This fear is natural and important to respect. Another challenge is not knowing where to start. There are so many types of LED lights and fixtures available.
Deciding which ones will work with existing setups can be confusing.
People might also worry about the cost. While a full rewiring is expensive, retrofitting can be very budget-friendly. They just need to know what options are available.
Finally, understanding compatibility is key. Will the new LED bulbs fit the old sockets? Will the existing light fixtures handle the new lights safely?
These are all valid questions that we will answer clearly.
Making the Switch Simple
The good news is that you can absolutely achieve a beautiful LED lighting upgrade without tearing up your kitchen. This guide is designed to make the process clear and easy. We’ll break down each step.
You’ll learn how to assess your current lighting. You’ll discover simple ways to
Assessing Your Current Kitchen Lighting
Before you can update your kitchen with new lights, it’s important to know what you have now. This first step is crucial for a successful How to Retrofit LED Lighting in an Old Kitchen Without Full Rewiring project. It helps you figure out what kind of changes are possible and what materials you’ll need.
This first step is crucial for a successful How to Retrofit LED Lighting in an Old Kitchen Without Full Rewiring project.
We’ll explore different types of existing fixtures. We’ll also discuss how to check the electrical capacity of your current setup. Taking the time to understand your current situation will save you time and potential headaches later on.
Types of Existing Light Fixtures
Older kitchens often have a few common types of light fixtures. You might have ceiling-mounted lights, like flush mounts or semi-flush mounts. These are usually attached directly to the ceiling.
There could also be pendant lights hanging down, perhaps over an island or a sink. Some kitchens might have under-cabinet lighting, often fluorescent tubes or small, older style halogen lights. It’s also possible you have simple bulb fixtures where the socket is visible.
Knowing the type of fixture helps determine the best LED
Understanding Your Existing Wiring and Power
When you’re thinking about How to Retrofit LED Lighting in an Old Kitchen Without Full Rewiring, it’s important to consider the electrical system. You don’t need to become an electrician, but a little knowledge goes a long way. Most older kitchens have standard electrical wiring running to the light fixtures.
When you're thinking about How to Retrofit LED Lighting in an Old Kitchen Without Full Rewiring, it's important to consider the electrical system.
The key is to understand the power draw of your current lights. You can usually find this information on the fixture itself or on the bulb.
New LED lights use much less power than older types. For example, an old 60-watt incandescent bulb might be replaced by a 9-watt LED bulb that gives off the same amount of light. This is great because it means your existing wiring can usually handle many more LED lights than it could handle older types.
You just need to make sure you don’t overload any single circuit. This is generally not an issue when just replacing bulbs. However, if you plan to add entirely new circuits or a lot of new fixtures, you might need to consult a professional.
Checking for Compatibility
Ensuring compatibility is a vital step for any DIY lighting project. You don't want to buy new LED bulbs only to find they don't fit or work with your existing fixtures. For How to Retrofit LED Lighting in an Old Kitchen Without Full Rewiring, this usually means checking two main things: the bulb base and the fixture type.Most common light bulbs have standard bases, like the Edison screw base (E26 or E27 in many countries). These are the most common types found in home light fixtures. If your current bulbs have this base, you can likely find LED bulbs with the same base to fit.
Some smaller fixtures might use smaller bases, like candelabra bases (E12). Always check the base of your current bulb.
For fixtures with integrated lights, like some fluorescent tubes or older sealed units, compatibility is different. You might need to look for specific LED replacement tubes designed to fit the existing ballast system or LED conversion kits. Some older fixtures might not be suitable for LED conversion, and in those cases, replacing the entire fixture might be the best option.
Step-by-Step Fixture Assessment Guide
Here’s a simple way to check your fixtures:
- Safety First: Turn off the power to the light fixture at the circuit breaker. Double-check that the power is off by trying to turn on the light switch.
- Identify Fixture Type: Look at your light fixture. Is it a ceiling mount, pendant, or under-cabinet light? Take a picture if needed.
- Check the Bulb: Carefully remove the old bulb. Note its shape, size, and the type of base it has (e.g., screw-in, pin-base). Look for any labels or numbers on the bulb that indicate its wattage or type.
- Examine the Fixture: Look inside the fixture for any manufacturer labels or model numbers. This can sometimes help you find information online about its compatibility.
- Note Any Ballasts or Drivers: For fluorescent or some specialized lights, you might see a ballast. This is a component that regulates power to the bulb. You’ll need to know if it’s compatible with LED replacements.
By following these steps, you’ll have a clear picture of what you’re working with. This knowledge is the foundation for making smart choices about your LED retrofit.
Simple LED Bulb Replacements
One of the easiest ways to upgrade your kitchen lighting is by simply replacing your old light bulbs with LED bulbs. This is the most straightforward aspect of How to Retrofit LED Lighting in an Old Kitchen Without Full Rewiring. It requires minimal effort and usually no special tools.
You can instantly benefit from the brightness and energy savings of LEDs by just screwing in a new bulb. This section will cover how to choose the right LED bulbs and what to expect when you make the swap.

Choosing the Right LED Bulbs
With so many LED bulbs on the market, picking the right ones can seem overwhelming. But it's quite simple once you know what to look for. The most important factors are the bulb's base type, its brightness, and its color temperature.
Base Type: As discussed, match the base to your existing fixture. Most home fixtures use an E26 (medium screw) base. If your old bulbs are candelabra-style for a decorative fixture, you’ll need E12 LED bulbs.
Always double-check this.
Brightness (Lumens): Forget wattage for a moment. LED brightness is measured in lumens. A standard 60-watt incandescent bulb is roughly equivalent to an 800-lumen LED bulb.
If you want a brighter light, choose LEDs with more lumens. If you want a dimmer light, choose fewer lumens. Manufacturers often list the incandescent equivalent on the packaging, which is helpful.
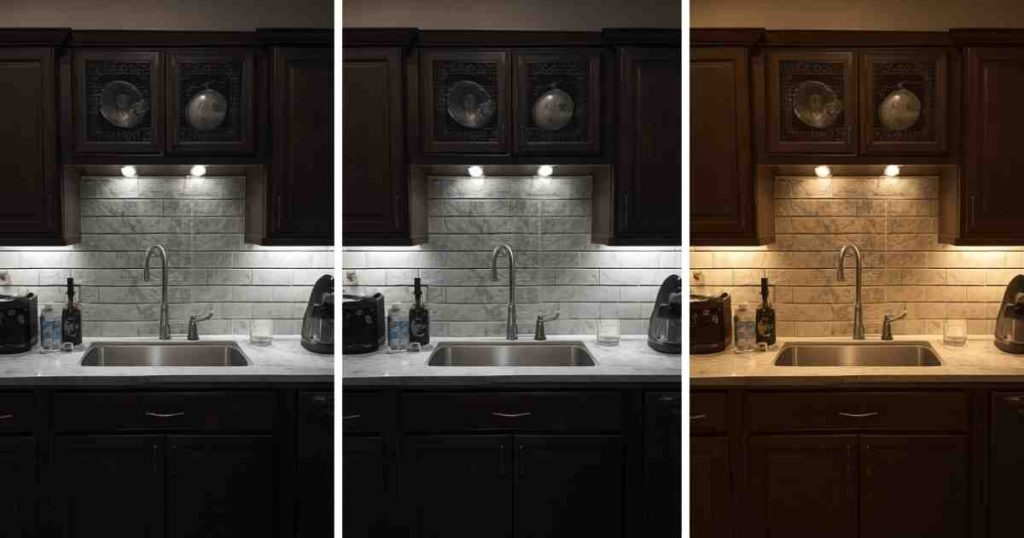
Color Temperature (Kelvin): This refers to the color of the light.
- Warm White (2700K – 3000K): This is similar to the warm, cozy glow of incandescent bulbs. It’s great for living areas and kitchens where you want a comfortable ambiance.
- Cool White (3500K – 4100K): This is a neutral, bright white light. It’s good for task lighting and kitchens where you need to see clearly.
- Daylight (5000K – 6500K): This is a very bright, bluish-white light, similar to natural daylight. It’s excellent for areas where you need maximum visibility, like over a work surface or in a workshop.
For a kitchen, a mix might be nice. You could use cooler temperatures for task areas like under cabinets or over the stove, and warmer temperatures for general ceiling lights or dining nooks.
The Simple Swap Process
Here’s how easy it is to replace your old bulbs:
- Turn Off Power: Always, always turn off the light switch for the fixture. Then, go to your electrical panel and flip the breaker that controls that circuit. This is critical for safety.
- Let Bulbs Cool: If the old bulbs have been on, let them cool down completely. They can get very hot.
- Remove Old Bulb: Gently unscrew the old bulb counter-clockwise. If it’s stuck, a rubber glove can give you a better grip.
- Install New LED Bulb: Take your new LED bulb and screw it in clockwise until it’s snug. Don’t overtighten.
- Restore Power: Go back to the breaker panel and turn the power back on.
- Test: Flip the light switch to make sure the new LED bulb works.
It’s that simple! You’ve just upgraded your kitchen’s lighting.
Benefits of Immediate Bulb Replacement
The advantages of this simple swap are clear and immediate. The most obvious is the instant reduction in energy consumption. Even a few LED bulbs can start lowering your electricity bill.
You’ll also notice improved light quality. Modern LEDs often offer better color rendering, meaning colors in your kitchen will look more vibrant and true. Many LEDs are also dimmable, which can add another layer of control to your kitchen’s ambiance.
This is a big upgrade from older fixtures that might not have had dimming capabilities.
The longevity of LEDs means you’ll spend less time and money on
Considerations for Different Fixture Types
While many fixtures accept standard LED bulbs, some require special attention. For example, some older recessed lighting fixtures might use a specific type of bulb or have a frosted glass cover that can diffuse the light. You’ll want to find LED bulbs that are designed to work well with these covers or consider LED bulbs specifically made for recessed lighting.
For globe-style fixtures, you might need smaller, round LED bulbs. If your fixture has a sealed glass enclosure, ensure the LED bulb you choose is rated for enclosed fixtures. Heat buildup can be an issue in enclosed spaces, and not all LEDs are designed to handle it.
Always check the product packaging for such ratings.
If your kitchen has fluorescent tube lighting, you can often
Adding New LED Lighting Without Major Rewiring
Beyond just swapping bulbs, you can add new light sources to your kitchen using LED technology without needing to run new wires through your walls. This is where the “without full rewiring” part of How to Retrofit LED Lighting in an Old Kitchen Without Full Rewiring really shines. There are fantastic plug-in LED options and battery-powered solutions that offer flexibility and style.
These methods are perfect for enhancing task lighting, adding accent lights, or improving overall illumination in darker corners.
Plug-In LED Solutions
Plug-in LED lights are a game-changer for DIY kitchen lighting upgrades. They require no electrical work beyond plugging them into an existing outlet. This makes them incredibly versatile.
Under-Cabinet Lighting: This is one of the most popular applications. You can buy LED strips or puck lights that plug into a wall outlet. They come with adhesive backing or clips for easy installation under your cabinets.
This is ideal for illuminating countertops for food prep. It adds a professional, finished look to your kitchen.
This is ideal for illuminating countertops for food prep.
LED Strip Lights: These flexible strips can be hidden along the top of cabinets, around windows, or even behind toe kicks. They often come with a remote control, allowing you to change colors or brightness. They are powered by a small plug-in adapter.
Plug-In Pendant Lights or Sconces: For a stylish accent, you can find decorative pendant lights or wall sconces that simply plug into an outlet. This allows you to add lighting features in places where running new electrical wires would be difficult or impossible. You can mount the fixture and then simply run the cord neatly along the wall or ceiling to the nearest outlet.
Cable management kits can help hide these cords for a clean look.
Battery-Powered LED Options
For areas where even a plug-in cord is not feasible, battery-powered LEDs are a great solution. While they require battery changes, they offer ultimate placement freedom.
Motion-Activated Lights: These are perfect for inside pantries or cabinets. They turn on automatically when you open the door and turn off after a set time. They are easy to stick in place with adhesive.
Decorative Accent Lights: Small LED puck lights or small accent lights can be placed on shelves or in corners to highlight decorative items. They are often controlled by a simple tap or a small remote.
Wireless LED Strip Lights: Some LED strips are designed to be battery-powered. These are great for temporary lighting needs or in areas where you don’t want any visible cords.
The main considerations with battery-powered lights are the battery life and the cost of replacement batteries. However, for specific applications, they offer unmatched convenience.
Creative Placement Ideas
Think outside the box when it comes to placing your new lights. Good lighting makes a kitchen more functional and inviting.
- Toe Kick Lighting: Install small LED strips or puck lights along the bottom edge of your cabinets, near the floor. This creates a soft, ambient glow that can make your kitchen appear larger and more modern. It also provides a subtle light for navigating the kitchen at night.
- Inside Cabinets and Drawers: For cabinets with deep shelves or drawers, consider battery-powered or small plug-in lights. These illuminate the contents, making it easy to find what you need without having to turn on the main kitchen lights.
- Above Cabinets: Placing LED strips or spotlights above your upper cabinets can cast a beautiful upward glow onto the ceiling. This adds architectural interest and a layer of indirect light, softening the overall atmosphere of the room.
- Range Hood Lighting: Many modern range hoods come with built-in LED lights. If yours doesn’t, you might be able to find a slim LED fixture that can be safely mounted under or near the hood to provide task lighting over the stovetop.
Safety Tips for Adding Lights
When using plug-in solutions, always ensure the cords are not a tripping hazard. Keep them tucked away and secured. Avoid running cords under rugs or in high-traffic areas.
For any fixture that requires mounting, make sure it is securely attached. If you are installing any LED lights that require connecting to a power source beyond a simple plug, or if you are modifying existing fixtures that are not simply bulb replacements, always turn off the power at the breaker. If you are unsure about any step, it’s always best to consult a qualified electrician.
When using battery-powered lights, make sure to use the type of batteries recommended by the manufacturer. Dispose of old batteries responsibly. Keep small battery-powered lights out of reach of young children.
Example: Under-Cabinet LED Strip Installation
Let’s walk through a common scenario: adding plug-in LED strip lights under your kitchen cabinets.
- Measure: Measure the length of the cabinets where you want to install the lights.
- Purchase Kit: Buy an LED strip light kit that matches your measurements. Most kits include the LED strip, a power adapter, and mounting clips or adhesive.
- Clean Surface: Make sure the underside of your cabinets is clean and dry.
- Install: Peel off the backing from the adhesive (if applicable) and press the LED strip firmly into place. Use the provided clips for extra security if needed.
- Connect Power: Plug the power adapter into the end of the LED strip and then into a nearby electrical outlet.
- Test: Turn on the outlet and the light strip. You may have an inline switch or a remote control.
This process typically takes less than an hour and dramatically improves workspace visibility.
Converting Existing Fixtures
Some older fixtures, like certain track lighting or recessed can lights, can be converted to LED without replacing the entire unit. This often involves purchasing specific LED conversion kits.
Track Lighting Conversion: If you have an older track lighting system with halogen or incandescent bulbs, you can often find LED bulbs designed to fit those specific track heads. The process is as simple as swapping the bulbs. However, you might need to check if the existing transformer (if it’s a low-voltage system) is compatible with the new LED load.
Some older transformers may not work well with the lower power draw of LEDs. In some cases, you might need to
Recessed Lighting (Can Lights): Many older recessed fixtures are designed for standard A19 or BR-style bulbs. In these cases, simply screwing in an LED bulb is all that’s needed. However, some recessed lights use specific types of bulbs, like GU10 or MR16.
For these, you can find LED replacements that match the base.
For older recessed fixtures with integrated lighting or those that are difficult to access, there are LED retrofit kits.
These kits typically include an LED module and a new trim piece that fits into the existing opening. They often come with their own driver (the component that regulates power) and can be wired directly to the existing fixture’s wiring.
This usually involves turning off the power and connecting a few wires.
Low-Voltage LED Systems
Low-voltage LED systems, typically operating at 12V or 24V, offer a safe and flexible way to add lighting.
They use a transformer to step down the household voltage (120V or 240V) to a safe low voltage. The low-voltage wires are much smaller and easier to run than standard household wiring.
LED Tape Lights: These are a very popular low-voltage option. They come on flexible strips and can be cut to size. They are powered by a transformer that plugs into an outlet or can be hardwired.
Running the low-voltage wires from the transformer to the LED strips is much simpler than high-voltage wiring. This is excellent for accent lighting, cove lighting, or under-cabinet lighting.
Low-Voltage Spotlights or Pendants: Some decorative lighting fixtures are designed to run on low voltage. These can offer a more premium look and feel. The transformer is usually hidden away, and only thin low-voltage wires need to be routed to the fixture locations.
The advantage here is the increased safety of low-voltage wiring, especially in damp kitchen environments. It also allows for more creative designs and easier installation in challenging locations.
Adding Dimmer Switches
To truly enhance the ambiance and functionality of your kitchen, consider adding dimmer switches. While this involves working with your existing electrical wiring, it’s generally a straightforward swap for an existing light switch.
Compatibility is Key: Not all LED bulbs are dimmable. Ensure the LED bulbs you choose are specifically marked as dimmable. Also, you need a dimmer switch that is compatible with LED lights.
Older dimmer switches designed for incandescent bulbs will not work correctly with LEDs and can cause flickering or buzzing.
Choosing the Right LED Dimmer: Look for LED-specific dimmer switches. These are designed to work with the lower power draw and different electrical characteristics of LEDs. There are many options available, from simple rotary dimmers to more advanced smart dimmers that can be controlled via an app or voice assistant.
Installation: Installing a dimmer switch typically involves turning off the power at the breaker, removing the old switch, and connecting the wires to the new dimmer according to the manufacturer’s instructions. If you’re not comfortable with basic electrical wiring, this is a task you might consider hiring an electrician for.
Professional Help for Tricky Spots
While this guide focuses on DIY solutions, there are times when calling a professional is the smartest move. If you have very old wiring that seems brittle or suspect it might be outdated (like knob-and-tube wiring), it’s best to have an electrician inspect it before making any changes.
Also, if your desired lighting plan involves adding new circuits, running wires through plaster walls, or working with complex fixture types, an electrician can ensure the job is done safely and up to code. They can also advise on the best solutions for your specific kitchen layout and electrical system.
Maintaining Your New LED Lighting
Once you’ve successfully retrofitted your kitchen with LED lighting, enjoying its benefits is the next step. However, like any home improvement, a little bit of care can ensure your new lights perform at their best for years to come. This section covers simple maintenance tips to keep your LEDs shining bright and how to handle potential issues.
This is an important part of the long-term success of How to Retrofit LED Lighting in an Old Kitchen Without Full Rewiring.
Cleaning Your LED Fixtures and Bulbs
Dust and grease can accumulate on light fixtures and bulbs in a kitchen environment. This can dim the light output and make your fixtures look less appealing.
For Bulbs: If you are replacing bulbs for cleaning, make sure the power is off at the breaker. Once cool, you can gently wipe the bulb with a soft, dry microfiber cloth. For tougher grime, you can slightly dampen the cloth with water, but ensure no moisture gets into the bulb’s base.
For Fixtures: Most light fixture surfaces can be cleaned with a damp cloth. For glass or plastic shades, you can use a mild soap and water solution. Always ensure the fixture is completely dry before restoring power.
Avoid using abrasive cleaners or solvents, as these can damage the finish of the fixture or the LED components.
Checking Connections and Power Sources
Periodically, it’s a good idea to check that everything is still securely connected.
- Plug-in Lights: Ensure the power adapters for your plug-in LED strips or lights are firmly seated in the outlet and connected to the light strip. Check the cords for any signs of damage.
- Battery-Powered Lights: Keep an eye on battery levels. Replace batteries as needed, using the type recommended by the manufacturer.
- Hardwired Fixtures: If you converted any fixtures or installed new ones that are hardwired, it’s wise to have an electrician check the connections every few years, especially if you notice any flickering or intermittent issues.
A quick visual inspection can catch potential problems before they become bigger issues.
Troubleshooting Common Issues
If your new LED lights aren’t working as expected, don’t panic. Here are a few common issues and their solutions: Readers looking for reliable background can compare this guidance with authoritative information about LED-compatible dimmer switch.
- Flickering: This is often due to an incompatible dimmer switch or an old transformer that can’t handle the LED’s low power draw. Ensure your dimmer and bulbs are LED-compatible. If it’s a transformer issue with low-voltage systems, the transformer might need replacing.
- Bulb Not Lighting Up: First, check that the power is on at the breaker and the switch. Ensure the bulb is screwed in securely. If it’s a new bulb, it might be faulty; try it in another known working socket.
- Dimmer Not Working Properly: Make sure you have an LED-compatible dimmer. Check that the bulb itself is dimmable. Sometimes, dimmers have a small adjustment screw to set the minimum dimming level.
- Lights Too Dim/Bright: This is usually a matter of choosing the wrong lumen output when purchasing bulbs. For future purchases, refer to your notes on desired brightness.
For more complex issues, or if you’re not comfortable troubleshooting electrical components, it’s always best to call a qualified electrician.
When to Call a Professional
While this guide empowers you to do much of the work yourself, knowing when to call for professional help is important.
- Safety Concerns: If you encounter wiring that looks damaged, old, or if you are ever unsure about turning off power or making connections, stop and call an electrician.
- Complex Installations: Adding multiple new circuits, installing lighting in damp areas like over a sink without proper fixtures, or integrating lighting into custom cabinetry might be best left to professionals.
- Persistent Problems: If you’ve tried basic troubleshooting and the issue persists, an electrician has the tools and expertise to diagnose and fix the problem.
- Code Compliance: For any work that might be subject to building codes, or if you’re selling your home, ensuring work is up to code by a professional is advisable.
Remember, the goal is to have beautiful, functional lighting that is also safe. Don’t hesitate to seek expert help when needed.
Frequently Asked Questions Of How To Retrofit Led Lighting In An Old Kitchen Without Full Rewiring
Can I really put LED bulbs in any old light fixture?
For most standard light fixtures with accessible bulb sockets, yes. You just need to make sure the LED bulb has the same base type as your old bulb (like a screw-in base) and that the fixture isn’t completely sealed, which could trap heat. Always check the packaging for any specific fixture type recommendations.
How much money can I save on my electricity bill by switching to LEDs?
LEDs use about 75-80% less energy than incandescent bulbs. So, if your old kitchen lights used a lot of power, you could see a noticeable drop in your electricity bill. The savings add up over time, especially since LEDs also last much longer.
Do I need a special dimmer switch for LED lights?
Yes, you generally do. Most LED bulbs need to be paired with an LED-compatible dimmer switch. Using an old dimmer switch designed for incandescent bulbs can cause your LEDs to flicker, buzz, or not dim properly.
What is the difference between warm white and cool white LED lights for a kitchen?
Warm white (around 2700K-3000K) has a cozy, yellowish glow similar to old incandescent bulbs, good for a relaxed feel. Cool white (around 3500K-4100K) is a brighter, more neutral white, better for tasks like cooking where you need to see clearly.
Is it safe to run LED strip lights under my kitchen cabinets if they plug into the wall?
Yes, it is generally safe, provided the installation is done correctly. Make sure the cords are not a tripping hazard and are kept away from water. Ensure the plug-in adapter and the strip itself are from reputable brands.
Final Thoughts
Upgrading your kitchen to LED lighting without a full rewiring is totally achievable. You can swap bulbs, add plug-in lights, and even convert some fixtures. This guide showed you how to do it safely and easily. This LED lighting upgrade can significantly improve your kitchen's efficiency and brightness.
Enjoy your brighter, more efficient kitchen!

![Under Cabinet Lighting Led Strips Vs Puck Lights — Which Is Better[1]](https://kitchentoolslab.com/wp-content/uploads/2026/05/Under-Cabinet_Lighting__Led_Strips_Vs_Puck_Lights_—_Which_Is_Better1-768x403.jpg)
![Kitchen Lighting Over Sink Best Fixture Types And Placement Rules[1]](https://kitchentoolslab.com/wp-content/uploads/2026/05/Kitchen_Lighting_Over_Sink__Best_Fixture_Types_And_Placement_Rules1-768x403.jpg)
![What Is Color Rendering Index (Cri) And Why It Matters For Kitchen Lighting[1]](https://kitchentoolslab.com/wp-content/uploads/2026/05/What_Is_Color_Rendering_Index_Cri_And_Why_It_Matters_For_Kitchen_Lighting1-768x403.jpg)
![Kitchen Lighting Mistakes That Make Your Space Look Cheap (And How To Fix Them)[1]](https://kitchentoolslab.com/wp-content/uploads/2026/05/Kitchen_Lighting_Mistakes_That_Make_Your_Space_Look_Cheap_And_How_To_Fix_Them1-768x403.jpg)
![How To Light A Kitchen With No Natural Light Solutions That Actually Work[1]](https://kitchentoolslab.com/wp-content/uploads/2026/05/How_To_Light_A_Kitchen_With_No_Natural_Light__Solutions_That_Actually_Work1-768x403.jpg)
![Smart Kitchen Lighting Dimmer Switches, Motion Sensors, And App Controlled Systems[1]](https://kitchentoolslab.com/wp-content/uploads/2026/05/Smart_Kitchen_Lighting__Dimmer_Switches_Motion_Sensors_And_App-Controlled_Systems1-768x403.jpg)