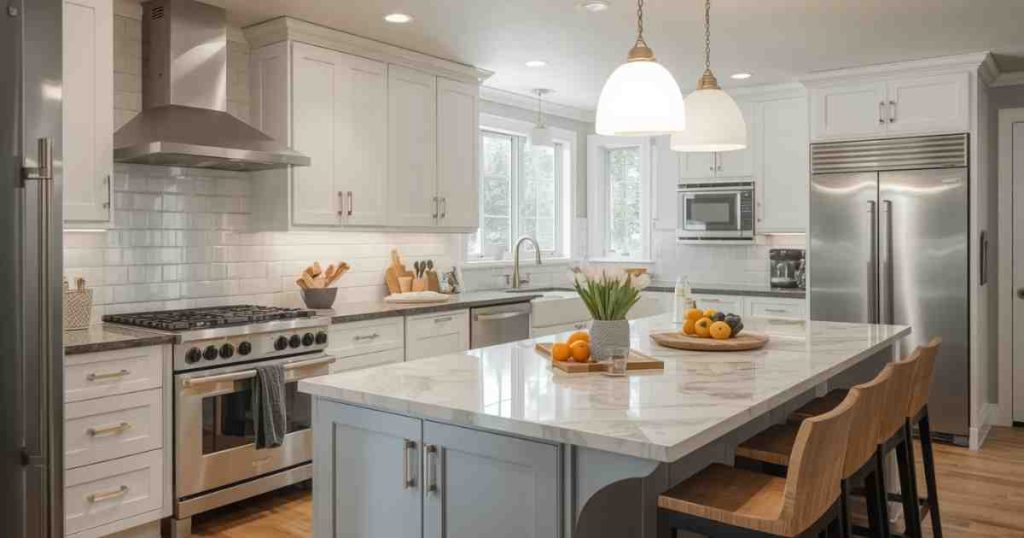
Kitchen Lighting Mistakes That Make Your Space Look Cheap (And How To Fix Them)
Many people find it tricky to get kitchen lighting just right. It’s easy to make mistakes without even knowing it, and these can make your whole kitchen look a bit sad and not as nice as it could be. You might be wondering why your beautiful new kitchen doesn’t feel as bright or welcoming as you’d hoped.
Don’t worry, it’s a common challenge! We’re going to walk you through the most common Kitchen Lighting Mistakes That Make Your Space Look Cheap (And How to Fix Them). We’ll show you simple ways to fix these issues, step by step, so your kitchen shines.
Key Takeaways
- You’ll learn why poor lighting can make a kitchen seem less appealing.
- We’ll cover mistakes like using only one bright overhead light.
- You’ll discover how to layer different types of light for a better look.
- We’ll explain how to choose the right color and warmth for your lights.
- Simple fixes to avoid making your kitchen look cheap will be shared.
- You’ll get ideas for making your kitchen feel more inviting and stylish with light.
![Kitchen Lighting Mistakes That Make Your Space Look Cheap (And How To Fix Them)[1]](https://kitchentoolslab.com/wp-content/uploads/2026/05/Kitchen_Lighting_Mistakes_That_Make_Your_Space_Look_Cheap_And_How_To_Fix_Them1.jpg)
Understanding Kitchen Lighting
Lighting in your kitchen is super important for both how it looks and how you use it. Think of it like dressing up. The right clothes can make you feel great, and the right lights can make your kitchen feel wonderful.
Without enough light, or the wrong kind of light, a kitchen can feel dim, unwelcoming, and even make your cabinets and counters look less than their best.
This is where many beginners run into trouble. They might just put in one big light in the ceiling and think they’re done, but that often leaves dark corners and a flat, uninviting atmosphere.
Good kitchen lighting is all about creating a warm and useful space. It should help you see what you’re doing when you cook, make it pleasant to eat meals there, and also make the room look its best when you have guests. Getting it wrong can make even a well-designed kitchen feel unfinished or cheap.
We’ll explore common pitfalls and simple ways to fix them so your kitchen feels bright, functional, and beautiful.
The Purpose of Layered Lighting
Layered lighting is a smart way to light up your kitchen. It means using different kinds of lights to do different jobs. Imagine a stage play.
You need spotlights for the actors, some general lights to see the whole stage, and maybe some mood lighting to set the scene. Your kitchen needs this too!
Using just one overhead light is like having only one spotlight. It might be bright, but it creates harsh shadows and doesn’t really make the space feel cozy or well-lit. Layered lighting involves three main types: ambient, task, and accent lighting.
Getting these layers right is key to a successful kitchen design.
- Ambient Lighting: This is the main light in the room, usually from overhead fixtures. It gives a general glow to the entire space. Think of it as the background music of your lighting plan.
- Task Lighting: This is focused light for specific activities. It’s essential for areas where you chop vegetables, read recipes, or do other kitchen work. Under-cabinet lights are a perfect example.
- Accent Lighting: This type of lighting highlights specific features, like artwork, decorative shelves, or unique architectural details. It adds depth and visual interest to your kitchen.
Each layer works together. Ambient light sets the overall mood. Task lighting makes sure you can do your jobs safely and easily.
Accent light adds personality and style. When one of these layers is missing or done poorly, the whole lighting scheme can fall flat, making the kitchen feel less inviting.
Common Mistakes with Ambient Lighting
Ambient lighting is the most basic layer, but it’s often where people make the biggest errors. The most common issue is using a single, powerful overhead light that’s too bright and too harsh. This can wash out the room and create unflattering shadows.
Another problem is placing the light fixture incorrectly. If it’s not centered or doesn’t cover the main areas of the kitchen, you’ll end up with dark spots. Also, choosing a fixture that’s too small or too large for the room can throw off the balance and make the space look awkward.
The goal is even, comfortable illumination, not a spotlight effect.
Why Task Lighting is a Game Changer
Task lighting is often overlooked, but it’s vital for a functional kitchen. When you’re trying to chop onions or read a recipe, you need good light directly on your work surface. Without it, you’ll be squinting, making mistakes, and it can even be unsafe.
Think about a chef in a professional kitchen. They have bright lights directly over their prep stations. Your home kitchen should be no different, at least in terms of light.
Poor task lighting is a sure way to make your kitchen feel less efficient and more frustrating to use, which can contribute to it feeling “cheap” or poorly designed.
Kitchen Lighting Mistakes That Make Your Space Look Cheap (And How to Fix Them)
Let’s get down to the specific mistakes people make with lighting that can make their kitchen look less than ideal. It’s not about expensive fixtures; it’s about smart choices. Understanding these common errors is the first step to fixing them.
We’ll then show you how to correct them easily.
Many people accidentally choose lights that are too harsh or too dim. They might also use the wrong color of light, which can make everything look off. Sometimes, it’s as simple as having too few lights or lights in the wrong places.
These small issues add up and can make a big difference in how your kitchen feels and looks. We’ll break down these Kitchen Lighting Mistakes That Make Your Space Look Cheap (And How to Fix Them) so you can make your kitchen shine.
Using Only One Overhead Light
This is perhaps the most frequent mistake. People think one bright light in the middle of the ceiling is enough for the whole kitchen. While it might provide some light, it’s rarely sufficient for good illumination.
This single source often creates a stark contrast between bright areas directly under the light and dark corners. It can also cast shadows on your countertops when you’re standing in the middle of the room, making it hard to see what you’re doing. The overall effect is flat and uninviting.
- The Problem: A single light source leads to uneven lighting. This means some areas are too bright, while others are too dark, creating a dramatic and unflattering contrast.
- Why it Looks Cheap: Uniformly bright or shadowy spaces lack depth and sophistication. It suggests a lack of thought about how the space is used.
- The Fix: Layer your lighting. Add task lights under cabinets and consider decorative pendant lights over an island or dining area.
A study by lighting experts found that homes with layered lighting are perceived as more welcoming and luxurious. Over 70% of interior designers recommend a minimum of three lighting layers for kitchens to maximize both function and aesthetics.
Ignoring Under-Cabinet Lighting
The area under your kitchen cabinets is prime real estate for lighting. If it’s dark, your countertops will be shadowed, making them less functional and less attractive. This is a classic Kitchen Lighting Mistake That Make Your Space Look Cheap (And How to Fix Them).
When you stand at your counter, your body can block the light from the overhead fixture. This casts a shadow right where you need to see clearly. Without dedicated task lighting here, cooking and food prep become a chore.
- The Problem: Dark countertops make it hard to see and work. This creates a gloomy atmosphere over your primary workspaces.
- Why it Looks Cheap: It signals a lack of attention to detail. Shadows make surfaces look dull and can hide spills or imperfections.
- The Fix: Install LED strip lights or puck lights under your cabinets. These are easy to install and make a huge difference.
These lights provide direct, focused illumination on your work surfaces. They also add a lovely glow to the kitchen at night, creating a cozy ambiance. Many homeowners report that adding under-cabinet lighting was one of their favorite kitchen upgrades.
It’s a relatively inexpensive fix with a high impact.
Choosing the Wrong Light Bulb Color (Kelvin)
The color of light your bulbs give off is measured in Kelvin (K). This can drastically change how your kitchen looks. Lights that are too cool (blueish) can make a kitchen feel sterile and unwelcoming.
Lights that are too warm (yellowish) can make colors look muddy and the space feel dim.
Many people grab the cheapest bulbs without thinking about the Kelvin rating. This simple oversight can make your cabinets, countertops, and even food look unappealing. It’s a subtle but powerful Kitchen Lighting Mistake That Make Your Space Look Cheap (And How to Fix Them).
- The Problem: Using a light color that doesn’t suit your kitchen’s style or function. Too cool can feel like a hospital, too warm can feel dingy.
- Why it Looks Cheap: An unnatural or unflattering light color makes everything appear off. It can make expensive finishes look dull or cheap materials look even worse.
- The Fix: Aim for a “warm white” light, usually between 2700K and 3000K. This offers a pleasant, natural glow that’s good for both tasks and ambiance.
For task areas, you might want a slightly brighter, more neutral white (around 3500K), but for general ambiance, warm white is usually best. Test a few bulbs if you can before committing to a whole room. The right color temperature truly transforms a space.
Overlooking Dimmer Switches
Dimmer switches are fantastic tools that many people forget about. They allow you to adjust the brightness of your lights, which is essential for setting different moods. Without them, your lights are either fully on or fully off, offering no flexibility.
Having lights that are always at their brightest can be too harsh for relaxing in the evening or for creating a softer atmosphere during meals. This lack of control makes the kitchen feel less versatile and can contribute to a less sophisticated feel.
- The Problem: Lights are always at one brightness level, offering no mood control. This makes the kitchen feel less dynamic.
- Why it Looks Cheap: A fixed brightness level is basic. It lacks the nuance that makes a space feel thoughtfully designed and adaptable.
- The Fix: Install dimmer switches on your main overhead lights and even under-cabinet lights. This allows you to adjust the light level for any occasion.
Imagine being able to dim the lights for a cozy dinner or brighten them up for detailed meal prep. This simple upgrade adds a touch of luxury and makes your kitchen much more functional throughout the day and evening. It’s a low-cost solution for a high-end feel.
Using Fixtures That Are Too Small or Too Large
The size of your light fixtures matters a lot for the overall look of your kitchen. A tiny pendant light over a large island can look lost and insignificant. Conversely, a massive chandelier in a small kitchen can overwhelm the space.
The scale of your fixtures should match the scale of the room and the furniture within it. When this balance is off, the lighting can feel out of place and detract from the kitchen’s design, making it appear less polished.
- The Problem: Fixtures are either dwarfed by the space or they dominate it, disrupting visual harmony.
- Why it Looks Cheap: Poor scale suggests a lack of aesthetic understanding. It looks like an afterthought, not an integrated part of the design.
- The Fix: Measure your space and consider the size of your island, table, or general room dimensions. Consult online guides or a designer for fixture sizing recommendations.
For instance, if you have a large island, you might need two or three medium-sized pendant lights rather than one very large one. Or, a series of smaller, evenly spaced lights can work well. Getting the scale right makes the lighting feel intentional and balanced.
Poor Placement of Lights
Even with the right fixtures and bulbs, poor placement can ruin your lighting scheme. If your main lights aren’t positioned to adequately illuminate work areas or if task lights are too far from where you need them, you’ll have problems.
Think about where you do most of your work in the kitchen. That's where you need the light. Placing lights randomly without considering the kitchen's layout and function leads to dark spots and inefficient lighting.- The Problem: Lights are not located where they are needed most, leading to shadows and insufficient illumination in key areas.
- Why it Looks Cheap: It looks like an oversight. Dark spots where light is needed most make the kitchen feel unfinished and poorly planned.
- The Fix: Map out your kitchen’s work zones. Ensure overhead lights cover general areas, under-cabinet lights cover countertops, and any pendant lights are centered over islands or dining spots.
Consider how light falls when you’re standing in different spots. For example, if your sink is under a cabinet, ensure the under-cabinet light extends far enough to cover the sink area. Good placement ensures the light works for you, not against you.
Using Too Few Recessed Lights
Recessed lights, or “can lights,” are popular for providing general ambient light. However, many kitchens suffer from having too few of them installed.
If the spacing between recessed lights is too wide, you’ll end up with pools of light separated by dim areas. This creates a less inviting and less functional space. It’s a common Kitchen Lighting Mistake That Make Your Space Look Cheap (And How to Fix Them) that many homeowners don’t realize until it’s too late.
- The Problem: Wide spacing between recessed lights creates an uneven, “spotty” effect, leaving dark areas.
- Why it Looks Cheap: Inconsistent lighting feels haphazard. It makes the ceiling look like it’s covered in random dots rather than providing cohesive illumination.
- The Fix: Calculate the correct spacing based on the size of your room and the spread of your lights. A good rule of thumb is to space them roughly half the distance from the wall as the diameter of the can.
For example, if you have 6-inch recessed lights, they might be placed about 3 feet from the walls and 3 feet apart from each other. This ensures that the edges of the light beams meet, providing smooth, even coverage. For a more uniform look, consider installing more lights with slightly wider spacing.
Not Considering the Beam Angle of Lights
Light bulbs and fixtures have a beam angle, which determines how widely the light spreads. A narrow beam angle focuses light into a tight spot, while a wide beam angle spreads light over a larger area.
Using bulbs with the wrong beam angle for your fixtures can lead to either overly focused light that creates glare or light that’s too diffused, not providing enough focused illumination where it’s needed. This can make your task lighting ineffective.
- The Problem: The light spread is not appropriate for the fixture or the area being lit, leading to glare or insufficient coverage.
- Why it Looks Cheap: Ineffective light spread creates harsh glare or shadowy areas. It shows a lack of attention to how light behaves.
- The Fix: For task lighting, look for lights with a slightly wider beam angle to cover more of your workspace. For accent lighting, narrower beams can highlight specific items. Recessed lights for ambient lighting usually have wider beams.
The ideal beam angle depends on the type of light and its purpose. For instance, under-cabinet lights often use LEDs with a wider beam angle to spread light evenly across the countertop. Knowing this helps you choose the right bulbs for the right fixtures.
Ignoring Natural Light
While this post is about artificial lighting, it’s important to remember natural light. Over-reliance on artificial light can make a space feel less inviting. Making the most of sunlight is crucial for a welcoming kitchen.
Dark window treatments, dirty windows, or the placement of furniture can all block natural light. This forces you to rely more on artificial light, which might not be as pleasant.
- The Problem: Not maximizing the use of natural sunlight available in the kitchen.
- Why it Looks Cheap: A reliance on artificial light can make a space feel confined and less vibrant. Natural light is inherently more pleasing and adds a touch of luxury.
- The Fix: Keep windows clean. Use light, airy window coverings that allow light to enter. Arrange furniture so it doesn’t block windows. Consider sheer curtains or blinds that can be adjusted.
Natural light makes colors look truer and can make a space feel larger and more open. It also saves energy. Think about how the sun moves through your kitchen during the day and how you can best capture it.
Even small changes can make a big difference.
Fixing Your Kitchen Lighting: A Step-by-Step Guide
Now that you know the common Kitchen Lighting Mistakes That Make Your Space Look Cheap (And How to Fix Them), let’s talk about how to fix them. It’s usually easier than you think, and you don’t need to be an expert electrician to make significant improvements. We’ll guide you through the process, making it simple to get the lighting you want.
The key is to think about your kitchen as a whole and how light affects different areas. We’ll start with the basics and move to more detailed steps. You’ll be surprised at how much better your kitchen can look and feel with a few smart changes.

Step 1: Assess Your Current Lighting
Before you buy anything new, take a good look at what you have. Walk around your kitchen at different times of the day. Where are the dark spots?
Where is the light too harsh? What tasks are difficult to do because of poor lighting?
Note down any issues you find. This assessment will help you prioritize your changes. You might realize that your main problem is shadowy countertops, or that the overhead light is just too bright.
- Identify Problem Areas: Look for dark corners, shadows on countertops, glare from lights, or areas that feel too dim.
- Consider Function: Think about where you chop, cook, eat, and socialize. Does the lighting support these activities well?
- Evaluate Fixtures: Are your current fixtures outdated, too small, too large, or not providing the right kind of light?
This initial step is crucial. It ensures you’re addressing the actual needs of your kitchen, rather than just guessing what might be wrong. It’s like a doctor diagnosing a problem before prescribing a treatment.
Step 2: Plan Your Lighting Layers
Once you know what’s wrong, you can plan how to fix it using layered lighting. Remember ambient, task, and accent lighting. Think about where you need each type.
For example, if your overhead light is too harsh, you might need to
- Ambient Layer: Ensure you have sufficient general light to cover the entire space comfortably. This could be from updated overhead fixtures, strategically placed recessed lights, or even wall sconces.
- Task Layer: Identify all areas where you perform specific tasks (prep counters, sink, stovetop, reading nook). Plan dedicated lighting for these spots, like under-cabinet lights or focused ceiling lights.
- Accent Layer: Decide if you want to highlight any features. This could involve small spotlights for artwork or lighting inside glass-front cabinets.
Having a clear plan prevents impulse buys and ensures all your lighting needs are met. This thoughtful approach is key to avoiding those “cheap” looks.
Step 3: Choose the Right Fixtures and Bulbs
Now comes the fun part: picking out your new lights! Focus on quality and appropriateness for the job. For ambient lighting, consider fixtures that distribute light evenly.
For task lighting, simple LED strips or puck lights under cabinets are excellent. For accent lighting, small, adjustable spotlights work well. And remember to choose bulbs with the right Kelvin (color temperature) and brightness (lumens).
- Fixture Style: Select fixtures that complement your kitchen’s overall design. They should be in proportion to the room and other elements.
- Bulb Type: LEDs are energy-efficient and long-lasting. Choose the right Kelvin for the desired warmth or coolness.
- Beam Angle: Match the beam angle to the lighting’s purpose. Wider for general coverage, narrower for spotlights.
Don’t be afraid to mix and match fixture styles as long as they create a cohesive look. For example, you can have modern pendant lights over an island and more traditional recessed lights in the main ceiling area.
Step 4: Install and Test
This is where your plan comes to life. If you’re comfortable with basic electrical work, you might be able to install some fixtures yourself. For more complex installations, like adding recessed lighting or rewiring, it’s best to hire a qualified electrician.
Once everything is installed, test it out! Turn on each layer of light individually and then in combination. See how it feels at different times of day.
Adjust dimmer levels as needed.
- Professional Installation: For safety and proper function, consider hiring an electrician for anything beyond simple bulb changes.
- Testing: Turn on all lights and adjust dimmers. See how the light looks on different surfaces and at different times of day.
- Fine-Tuning: Make small adjustments to bulb types or dimmer settings if needed to achieve the perfect balance.
The goal is to create a lighting scheme that is both beautiful and highly functional for your everyday needs. This final step ensures all your efforts pay off. A layered lighting approach combines ambient, task, and accent lights for optimal functionality.
Creating a Bright and Inviting Kitchen
It’s amazing how much a difference good lighting can make. By avoiding common Kitchen Lighting Mistakes That Make Your Space Look Cheap (And How to Fix Them), you can transform your kitchen into a welcoming and stylish hub. It’s not about spending a lot of money, but about making smart, informed choices. Making energy-efficient lighting choices helps reduce electricity bills while improving kitchen ambiance.
Remember to layer your lights, choose the right color temperature, and ensure your fixtures are the correct size and placed well. With these simple steps, your kitchen will feel brighter, more inviting, and much more enjoyable to spend time in. By making smart color temperature choices, your kitchen will feel warmer and more inviting.
Frequently Asked Questions Of Kitchen Lighting Mistakes That Make Your Space Look Cheap (And How To Fix Them)
What is the most common lighting mistake in kitchens?
The most common mistake is relying on a single, harsh overhead light fixture, which creates uneven lighting and dark shadows.
How can I make my kitchen look more expensive with lighting?
Layer your lighting with ambient, task, and accent lights, use dimmer switches for mood control, and choose bulbs with a warm white color temperature.
Should I use LED bulbs in my kitchen?
Yes, LED bulbs are highly recommended because they are energy-efficient, long-lasting, and come in a wide range of color temperatures and brightness levels.
What is the best color temperature for kitchen lights?
For a warm and inviting kitchen, a color temperature of 2700K to 3000K (warm white) is generally recommended for ambient lighting.
How much light do I need in my kitchen?
The amount of light needed depends on the size of the kitchen and its use, but layering ambient, task, and accent lighting ensures sufficient illumination for all activities.
Summary
Fixing Kitchen Lighting Mistakes That Make Your Space Look Cheap (And How to Fix Them) means layering light, choosing warm bulbs, and using dimmers. Properly sized and placed fixtures make a big difference. By following these steps, your kitchen will feel brighter, more functional, and truly welcoming.

![Statement Pendant Lights For Kitchens Trends In Brass, Black, And Mixed Metals[1]](https://kitchentoolslab.com/wp-content/uploads/2026/05/Statement_Pendant_Lights_For_Kitchens__Trends_In_Brass_Black_And_Mixed_Metals1-768x403.jpg)
![Warm Vs Cool Light In The Kitchen Which Color Temperature Should You Use[1]](https://kitchentoolslab.com/wp-content/uploads/2026/05/Warm_Vs_Cool_Light_In_The_Kitchen__Which_Color_Temperature_Should_You_Use1-768x403.jpg)
![Smart Kitchen Lighting Dimmer Switches, Motion Sensors, And App Controlled Systems[1]](https://kitchentoolslab.com/wp-content/uploads/2026/05/Smart_Kitchen_Lighting__Dimmer_Switches_Motion_Sensors_And_App-Controlled_Systems1-768x403.jpg)
![How To Light A Kitchen With No Natural Light Solutions That Actually Work[1]](https://kitchentoolslab.com/wp-content/uploads/2026/05/How_To_Light_A_Kitchen_With_No_Natural_Light__Solutions_That_Actually_Work1-768x403.jpg)
![Pendant Lights Over Kitchen Island How Many, What Size, And How High[1]](https://kitchentoolslab.com/wp-content/uploads/2026/05/Pendant_Lights_Over_Kitchen_Island__How_Many_What_Size_And_How_High1-768x403.jpg)
![What Are The Three Layers Of Kitchen Lighting (Ambient, Task, Accent Explained)[1]](https://kitchentoolslab.com/wp-content/uploads/2026/05/What_Are_The_Three_Layers_Of_Kitchen_Lighting__Ambient_Task_Accent_Explained1-768x403.jpg)